In diesem Artikel will ich kurz beschreiben wie man eine Zeit Dimension erstellt und in PowerPivot verwendet. Für eine Datums-Dimension siehe hier.
Als erstes brauchen wir eine Zeit Tabelle:
CREATE TABLE [dbo].[Dim_Time]
(
[Time] TIME NOT NULL,
[am_pm] CHAR(2) NOT NULL,
CONSTRAINT [PK_Table] PRIMARY KEY ([Time])
)
Mit folgendem Script befallen wir die Tabelle:
DECLARE @time TIME = '00:00:01';
DECLARE @ampm CHAR(2);
DECLARE @Stop BIT = 0;

WHILE @Stop = 0
BEGIN
IF @time < '12:00:00'
BEGIN
SET @ampm = 'am';
END
ELSE
BEGIN
SET @ampm = 'pm';
END

INSERT INTO Dim_Time (Time, am_pm)
VALUES (@time, @ampm);

SET @time = DATEADD(ss, 1, @time);
IF @time = '23:59:59' SET @stop = 1;

END
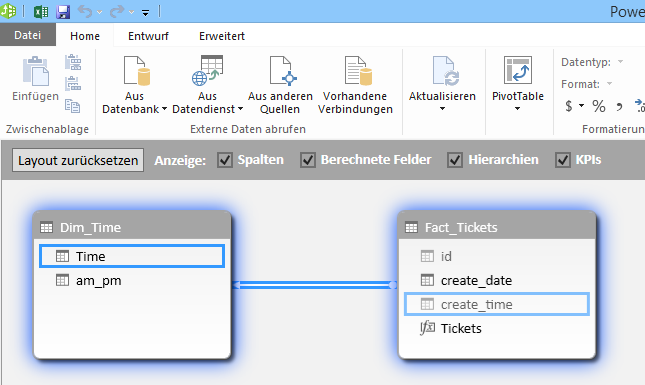
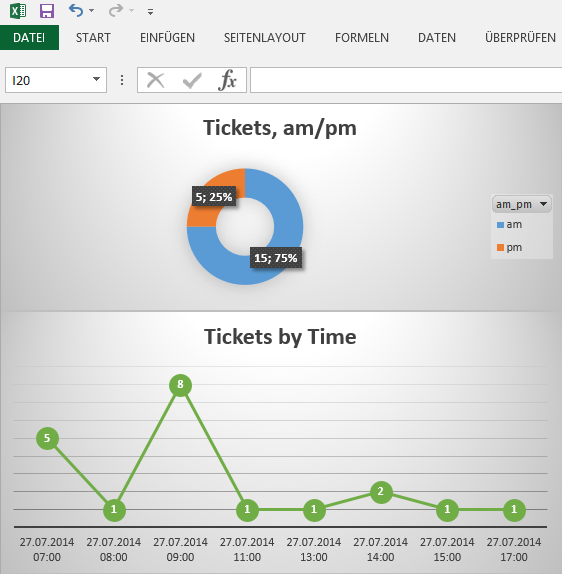
Nun können wir die Tabelle mit Daten in PowerPivot (oder was auch immer ..) verwenden:
In this article I will describe, how to create and use a time dimension in a powerpivot model– how to create and populate a date dimension table take a look here.
First we must create the table with the time data:
CREATE TABLE [dbo].[Dim_Time]
(
[Time] TIME NOT NULL,
[am_pm] CHAR(2) NOT NULL,
CONSTRAINT [PK_Table] PRIMARY KEY ([Time])
)
Now we must populate the table with data:
DECLARE @time TIME = '00:00:01';
DECLARE @ampm CHAR(2);
DECLARE @Stop BIT = 0;

WHILE @Stop = 0
BEGIN
IF @time < '12:00:00'
BEGIN
SET @ampm = 'am';
END
ELSE
BEGIN
SET @ampm = 'pm';
END

INSERT INTO Dim_Time (Time, am_pm)
VALUES (@time, @ampm);

SET @time = DATEADD(ss, 1, @time);
IF @time = '23:59:59' SET @stop = 1;

END
Now we can use the data in PowerPivot (or something else):


